PUBLICATION HISTORY
| Version | Date | Modification |
|---|---|---|
| V 5.1 | 13/09/2019 | Updates to take changes in Prelude 5.1 into account |
| V 5.0 | 07/09/2018 | Updates to take changes in Prelude 5.0 into account |
| V 4.1 | 21/07/2017 | Updates to take changes in Prelude 4.1 into account |
| V 4.0 | 27/02/2017 | Updates to take changes in Prelude 4.0 into account |
| V 3.1 | 14/09/2016 | Updates to take changes in Prelude 3.1 into account |
| V 3.0 | 20/05/2016 | Updates to take changes in Prelude 3.0 into account |
| V 2.1 | 21/08/2015 | Updates to take changes in Prelude 2.1 into account |
| V 2.0 | 20/10/2014 | Initial version |
Introduction
Object
This guide presents:
- The Prelude SIEM product;
- The steps to install the product:
- Modules installation: Prelude Manager and Prelude GUI;
- Agents installation: Prelude LML, Prelude Correlator;
Scope of this document
This document is applicable to:
- Prelude SIEM version 5.2;
- Operating systems:
- CentOS/Redhat version 7 - 64 bits.
- Databases:
- PostgreSQL version 9.6 and newer;
- External sensors:
- Suricata version 2.0 and newer;
- Samhain version 3.1 and newer;
- OSSEC version 2.7 and newer.
Audience for this document
This document is mainly dedicated to the following teams:
- The Prelude SIEM integration team;
- The Prelude SIEM support and deployment team;
- The Prelude SIEM administration team;
- The Prelude SIEM users.
References
This section gives links for the web page of the Prelude product, databases, external sensors and operating systems:
- Prelude SIEM: https://www.prelude-siem.com and https://www.prelude-siem.org
- Databases:
- PostgreSQL: http://www.postgresql.org
- External sensors:
- Suricata: http://suricata-ids.org/
- Samhain: http://www.la-samhna.de/samhain
- OSSEC: http://ossec.github.io
- Operating systems:
- CentOS/Redhat: http://www.centos.org
Prelude SIEM: The security monitoring
Prelude SIEM is an open-source security monitoring solution. Its objective is to centralize all security events of an information system and to offer a homogeneous vision to the operators. Prelude SIEM collects, normalizes, sorts, aggregates, correlates and reports all security-related events independently of the product brand or license giving rise to such events.
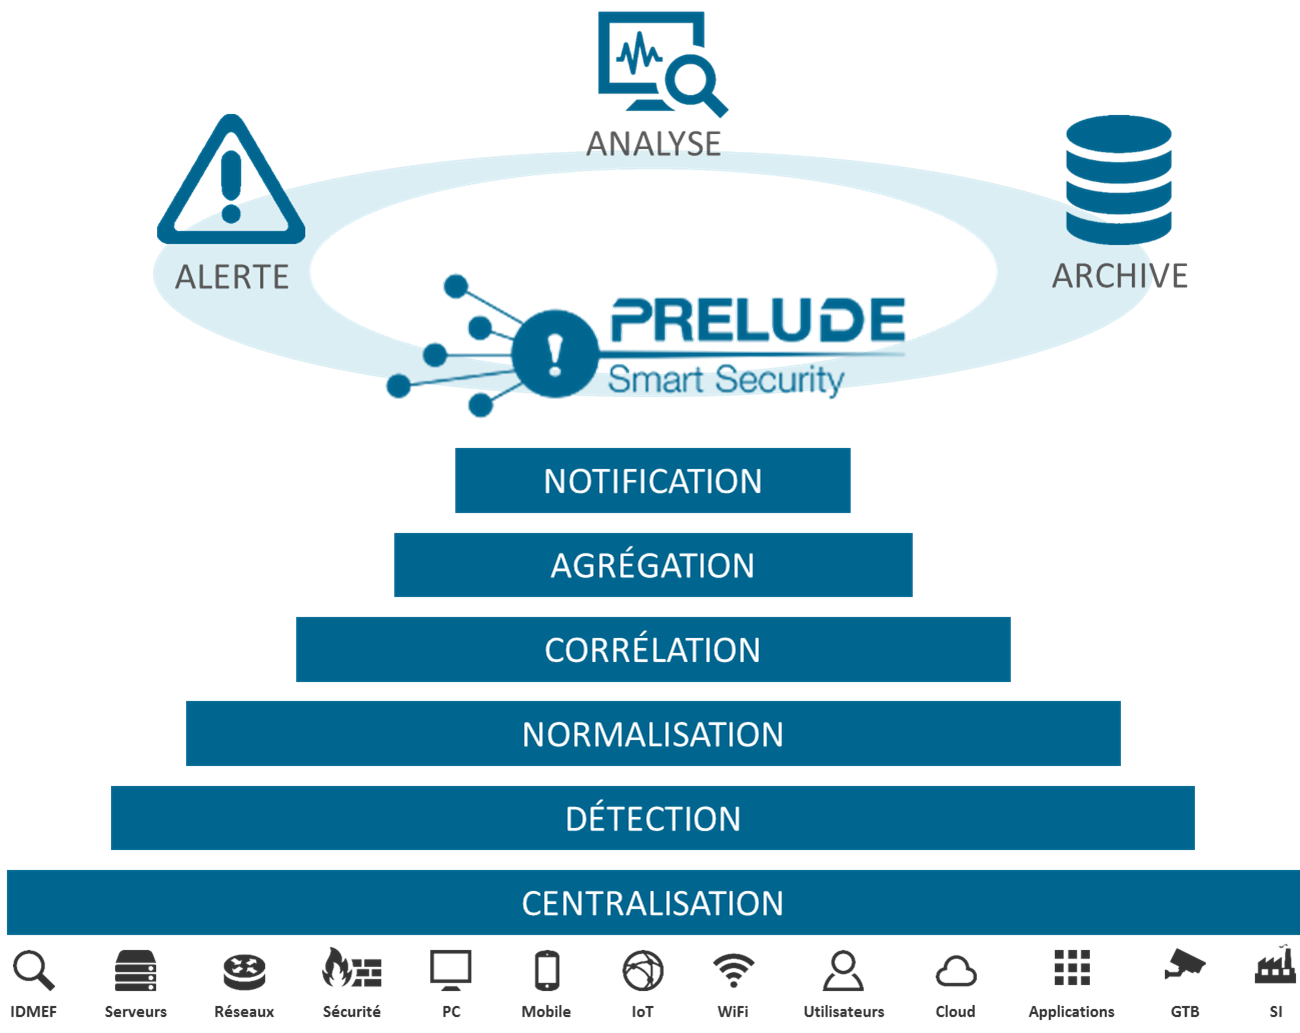
Figure: Features of Prelude SIEM
Prelude SIEM presents a specificity almost unique in the SIEM community: it implements the IDMEF format. This format is defined in an RFC since 2007 at the IETF and allows homogenizing the way a security alert is presented. Through the use of this format and its interconnection library, it is easy to make other tools communicate with Prelude SIEM. Beyond its capacity to analyze any type of log (system logs, log streams, flat files, etc.), Prelude SIEM also benefits from a native support with a number of HIDS and NIDS sensors; with the best known being Snort, Samhain, OSSEC and Suricata.
Prelude SIEM is available in three versions:
- Prelude OSS: Free, public and open-source version, released under GPL V2 license. Prelude OSS implements the event management part of Prelude (SEM). Since version 5.2, Prelude OSS also makes it possible to store, display and analyze raw security information (SIM). This version is intended for small parks of limited size (<10 machines), students, research organizations, as well as for testing by users interested in acquiring Prelude SIEM. The performance of Prelude OSS is highly limited by the volume of data analyzed.
- Prelude SIEM: Professional version based on the open-source version Prelude OSS and that greatly enhances its performance. Prelude SIEM offers many additional features (ticket management, dynamic statistics, geolocation, archiving, etc.) and capabilities to be deployed and operated easily and efficiently on complex and large-scaled parks of machines.
- Prelude SOC: Fully scaled version, mainly for Security Operational Center (SOC) usage. Necessary modules for an operational security center, in addition to Prelude SIEM, are: Prelude MAP (network topological representation), Prelude CTI (Cyber Threat Intelligence) and Prelude NOC (performance and availability monitoring).
The Prelude SIEM modules
The following figure shows how Prelude SIEM’s modules communicate together:
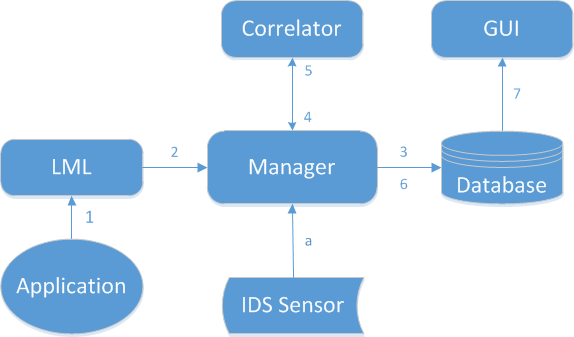
Figure: Event tracking between Prelude SIEM modules
The path of an event between the different Prelude SIEM modules is as follows:
- The application generates a log and sends it to Prelude LML (either under file form or through a Syslog connection);
- The log is analyzed by Prelude LML (thanks to its set of rules). If this log is considered suspicious, Prelude LML creates an IDMEF alert and sends it to its manager (Prelude Manager that can be chained to another Prelude Manager instance);
- Prelude Manager performs the filters and treatments that are configured and then inserts the event into the database;
- Prelude Correlator receives the alerts from Prelude Manager;
- If several raw alerts match a correlation scenario, a correlation alert is generated and sent to Prelude Manager;
- Prelude Manager also writes correlation alerts into the database;
- Prelude GUI connects to the database via LibPreludeDB in order to read information and sends it to a browser.
In parallel, Prelude Manager can receive alerts from other sources:
- A third-party intrusion detection sensor sends its alerts to Prelude Manager (e.g. OSSEC, Samhain, Suricata, etc).
Quick Overview
This chapter aims to present some significant aspects of Prelude SIEM for a proper installation functioning. It is important before installing the product to get acquainted with:
- The different parts of Prelude SIEM;
- The registration of an agent;
- The command lines to use for the installation.
The available modules with Prelude SIEM are:
- Prelude Manager;
- Prelude LML;
- Prelude Correlator ;
- Other IDMEF compatible sensors.
An agent profile contains:
- A unique sensor ID also named analyzer ID;
- A configuration file;
- A private key;
- X509 certificates for the remote agent links.
Prelude admin is the main administration tool of the libprelude.
This tool is used to:
- Register an agent to a manager;
- Manage the profile of the previously registered agent (ex: modification, removal, etc.).
Prelude Manager is the core of Prelude.
Introduction
The following figure shows the communication of the three main parts of Prelude SIEM:
Prelude is divided into three main parts:
- The Prelude SIEM components;
- The database;
- The Web server.
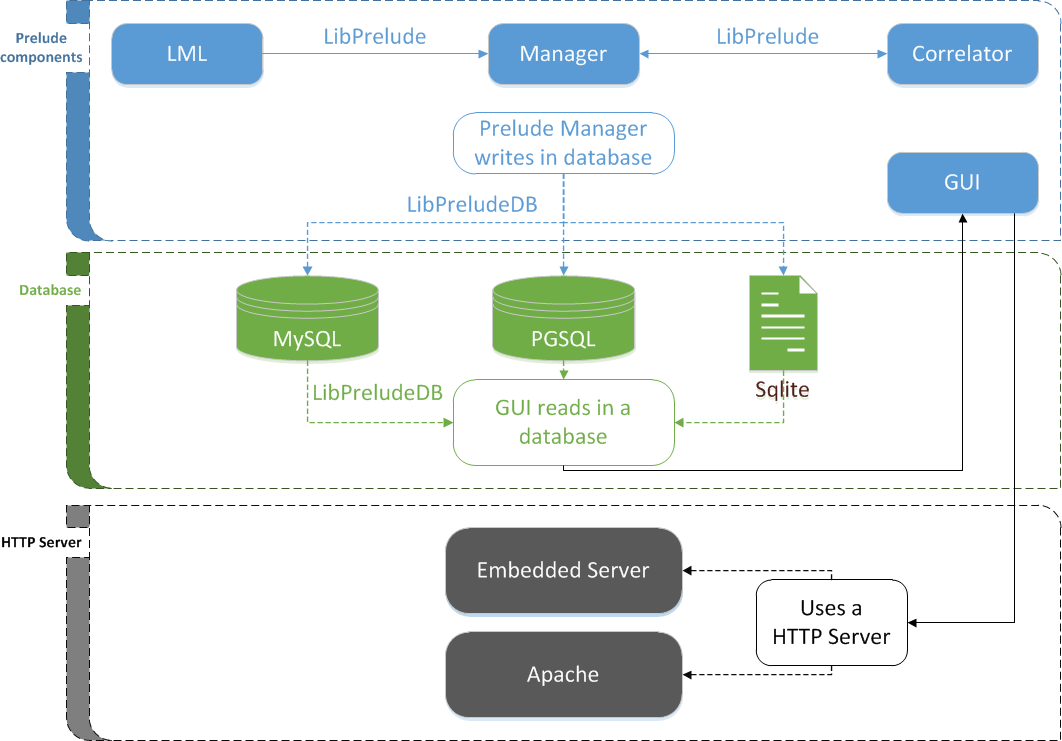
Figure : Prelude modules to install
Prelude being modular, the external sensors will be added after installing Prelude.
The manager supports two databases which are MySQL and PostgreSQL. It connects to a database to store received alerts.
Prelude GUI connects to the database in order to exploit these alerts by displaying them in a browser through an embedded web server or the Apache web server.
Configuration file template
Each configuration file applies the following formalism:
- A tag, to indicate the beginning of a section: [name]
- Configuration variables inside a section: key = value or key
- A comment marker at the beginning of the line: #
Example:
[prelude]
# Comment on the section
# Comment on the command
tcp-keepalive-time = 7200
# Comment on the command
tcp-keepalive-probes =
# Comment on the command
tcp-keepalive-intvl = 75
Prelude-Admin
Each module from your Prelude installation must be registered with the manager which is in charge of communications between modules.
Presentation
An agent is a Prelude client, i.e. a program using libprelude. It can be an analyzer or a manager. Examples:
- prelude-lml ;
- prelude-correlator.
An agent profile is identified by its name. When an agent is started, it will load the profile of the same name as the program itself, that is, if your agent is named prelude-lml, the agent will load the profile named prelude-lml.
Prelude-admin can be used to perform various operations involving an agent profile.
A profile is required for a Prelude agent to run and communicate correctly with other agents.
Creating a profile
The add command is used to create a new manager profile. The created profile will have the permissions of the user defined by their uid and gid.
prelude-admin add <profile_name> --uid <uid> --gid <gid>
| Parameters | Explanations | Example |
| <profile name> | The name of the sensor you are installing. | prelude-manager |
| <uid> | UID or user used to create the analyzer profile | prelude-manager |
| <gid> | GID or group used to create the analyzer profile | prelude |
Example:
Register the Prelude Manager profile:
prelude-admin add prelude-manager --uid prelude-manager --gid prelude
Note
Private key generation might take a very long time. You can increase the system’s entropy to speed up the process, for example by moving the mouse, typing text with the keyboard, or sending network traffic to this machine.
Removing a profile
The del command deletes the specified profile.
prelude-admin del <profile_name>
Example:
prelude-admin del prelude-correlator
Listing profiles
The list command lists the available profiles on the system.
Example:
prelude-admin list
Result:
Profile            Permission Issuer AnalyzerID
-----------------------------------------------
prelude-lml        idmef:w    4267880333605425
prelude-correlator idmef:rw   4267880333605425
prelude-manager    n/a        n/a
The ‘-l’ option prints the detailed listing, including UID, GID and profile analyzerID.
Note
The prelude-admin list command only lists local profiles on the system.
Example:
prelude-admin list -l
Result:
Profile            UID                GID     AnalyzerID       Permission Issuer AnalyzerID
-------------------------------------------------------------------------------------------
prelude-lml        prelude-lml        prelude 1968286123854203 idmef:w    4267880333605425
prelude-correlator prelude-correlator prelude 1700890049940141 idmef:rw   4267880333605425
prelude-manager    prelude-manager    prelude 4267880333605425 n/a        n/a
Registering agents
This section explains how to register an agent after its installation. In order for an agent to connect and communicate with a manager, it needs to be registered.
Registering an agent
The agent registration process is driven by a single tool called prelude-admin.
prelude-admin register <profile_name> <requested_permissions> <manager_address> --uid <uid> --gid <gid>
| Command line fields | Explanations | Value example |
| <profile name> | The name of the sensor you are installing. | prelude-lml |
| <requested_permissions> | Both idmef and admin types can take read (r) and write (w) permissions. Usually, a sensor needs a permission for writing IDMEF messages to a manager, and optionally accept an administrative command sent to the sensors. | “idmef:w” |
| <manager_address> | The address where the Prelude Manager is registered, this can either be its IP address or its hostname. Typically, if you made a local installation, you can write localhost there. | 127.0.0.1 |
| <uid> | UID or user used to create the analyzer profile | prelude-lml |
| <gid> | GID or group used to create the analyzer profile | prelude |
The following command line allows to retrieve the uid and gid number of a user:
id <sensor_name>
Example:
id prelude-correlator
Result:
uid=107(prelude-correlator) gid=999(prelude) groupes=999(prelude)
Note
By default, the creation of the sensor profile uses the UID and GID of the user who launched the prelude-admin command. If you want the profile to be run by another set of permissions, use the –uid and –gid options.
Example of agent registration:
prelude-admin register prelude-lml "idmef:w admin:r" 127.0.0.1 --uid prelude-lml --gid prelude
The following table shows the different fields’ values of the command line for agent registration:
| Profile name | Permissions | uid | gid |
|---|---|---|---|
| prelude-lml | idmef:w admin:r | <id prelude-lml> | <id prelude-lml> |
| prelude-correlator | idmef:rw | <id prelude-correlator> | <id prelude-correlator> |
Registration server
The registration-server command launches a registration server for the specified Prelude Manager profile. The profile will be created if it does not exist. The registered analyzers will be able to communicate with the Prelude Manager instance using this profile.
prelude-admin registration-server prelude-manager
Registration procedure
The agent registration process contains two steps and needs two terminals:
- Register an agent in the first terminal;
- Launch a registration server in the second terminal;
Copy the password that appears on the second terminal and paste it in the first terminal;
Return to the second terminal and enter ‘y’ to approve the registration.
Now, your agent is registered.
Agent registration example
Here is an example of registering the Prelude LML module to a Prelude Manager running on localhost:
- In a terminal, enter the following command to register a Prelude LML agent:
prelude-admin register prelude-lml "idmef:w admin:r" 127.0.0.1 --uid 0 --gid 0
Note
The first time an agent is registered, prelude-admin will need to create a private key for the agent.
Note
The IP address in this command represents the address of the Prelude Manager server which the sensor registers to.
The following lines appear:
Generating 2048 bits RSA private key... This might take a very long time.
[Increasing system activity will speed-up the process].
Generation in progress... +++++O......+++++O
You now need to start "prelude-admin" registration-server on 127.0.0.1:
example: "prelude-admin registration-server prelude-manager"
Enter the one-shot password provided on 127.0.0.1:
A password is required.
- In a second terminal, enter the following command to generate a password:
prelude-admin registration-server prelude-manager
Note
the prelude-manager profile here is the profile name of the prelude-manager module hosted on the registration server.
The following lines appear:
The "gn0zklcs" password will be requested by "prelude-admin register"
in order to connect. Please remove the quotes before using it.
Generating 1024 bits Diffie-Hellman key for anonymous authentication...
Waiting for peers install request on 0.0.0.0:5553...
Waiting for peers install request on :::5553...
A password is generated.
- Copy and paste the password in the first terminal as requested;
- Copy again the password to confirm it.
The following lines appear:
Enter the one-shot password provided on 127.0.0.1:
Confirm the one-shot password provided on 127.0.0.1:
Connecting to registration server (127.0.0.1:5553)... Authentication succeeded.
- Return to the second terminal, and press the ‘y’ key, followed by the “Enter” key, to approve registration.
Connection from 127.0.0.1:32846...
Registration request for analyzerID="736730028094459" permission="idmef:w".
Approve registration? [y/n]: y
127.0.0.1:32846 successfully registered.
The operation was successful. You now have a running sensor.
Particular commands for installation
This section presents specific commands for Prelude SIEM installation. According to the operation system used, command lines will be different.
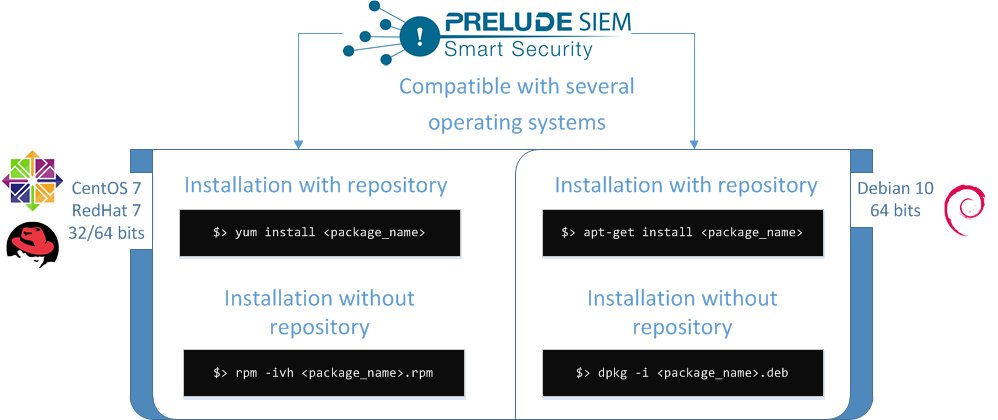
Figure : Prelude SIEM compatibility
Throughout the document, the installation will be explained with the command lines using packages included in a repository.
On CentOS/RedHat
Installation command with a repository:
yum install <package_name>
Example:
yum install prelude-manager
Installation command without a repository:
yum install /<path_to>/<package_name>.rpm
Example:
yum install /tmp/prelude-manager-<version>.rpm
Note
See List of package names for the list of package names.
Automatic startup of services
This section explains how to start automatically the service at the same time as the rest of the operating system. This configuration is optional, but is recommended in order to avoid starting services manually after each reboot.
On CentOS/RedHat
Activating the automatic startup for a service is done with the following command:
systemctl enable <service_name>
Initialize the Prelude SIEM database
The database installation is a prerequisite to install Prelude.
Introduction
The database installation will allow the manager to store alerts, which will be exploited by the Prelude GUI.
Prelude SIEM can interact with different databases which are:
- MySQL or MariaDB;
- PostgreSQL.
The following figure shows the link between Prelude modules and databases:
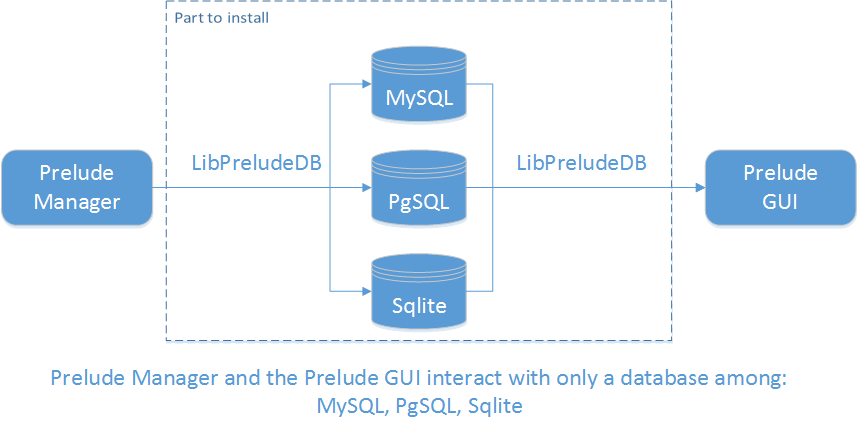
Figure: Database installation
To interconnect the database with Prelude, it is essential to install LibpreludeDB.
These next sections show how to install the databases with MySQL/MariaDB, PostgreSQL and LibpreludeDB.
LibpreludeDB installation
The LibpreludeDB library provides an abstraction layer upon the type and the format of the database used to store IDMEF alerts.
The package name of the LibpreludeDB module is:
| CentOS/RedHat |
| libpreludedb |
Refer to the chapter Prelude SIEM database Installation to install this package.
LibpreludeDB installation
The package name of the LibpreludeDB module is:
| CentOS/RedHat |
| libpreludedb |
Refer to the chapter Prelude SIEM database Installation to install this package.
PostgreSQL installation
Proper installation of PostgreSQL consists of the following procedure:
- Installing the database server;
- Installing the libpreludedb-pgsql plugin;
- PostgreSQL startup configuration (optional).
PostgreSQL server installation
The package name of the database server is:
| CentOS/RedHat |
| postgresql-server |
Refer to the chapter Prelude SIEM database Installation to install this package.
Installing the libpreludedb-pgsql plugin
The package name is:
| CentOS/RedHat |
| libpreludedb-pgsql |
Refer to the chapter Prelude SIEM database Installation to install this package.
PostgreSQL startup configuration
Refer to the section Particular commands for installation.
Configuring access to databases
The configuration files of Prelude GUI (/etc/prewikka/prewikka.conf) and Prelude Manager (/etc/prelude-manager/prelude-manager.conf), contain a section that allows you to configure access to a database. This is done by initializing several variables present in the following table:
| Variables | Explanations | Example |
| type | The type of database | mysql (or pgsql) |
| host | The host on which the database listens | localhost or another IP address |
| port | The port number on which the database listens (3306 or 5432) | 3306: connection between the manager and the MySQL database 5432: connection between the manager and the PostgreSQL database |
| name | Name of the database | The name of the database corresponding to that specified at creation |
| user | Username to use to connect to the database | The username corresponding to that specified when creating the database |
| pass | Password used to connect to the database | The password corresponding to that specified when creating the database |
Each time a configuration file is modified, think to restart the module service.
Prelude SIEM installation
This chapter explains in details the installation of Prelude SIEM with a repository.
To install an external package, see the List of package names for the package name and Particular commands for installation for the command line installation.
Introduction
The Prelude SIEM installation requires to install the following modules:
- Libprelude;
- LibpreludeDB;
- Prelude Manager;
- Prelude LML;
- Prelude Correlator ;
- Prelude GUI.
The following figure shows the Prelude SIEM modules to install.
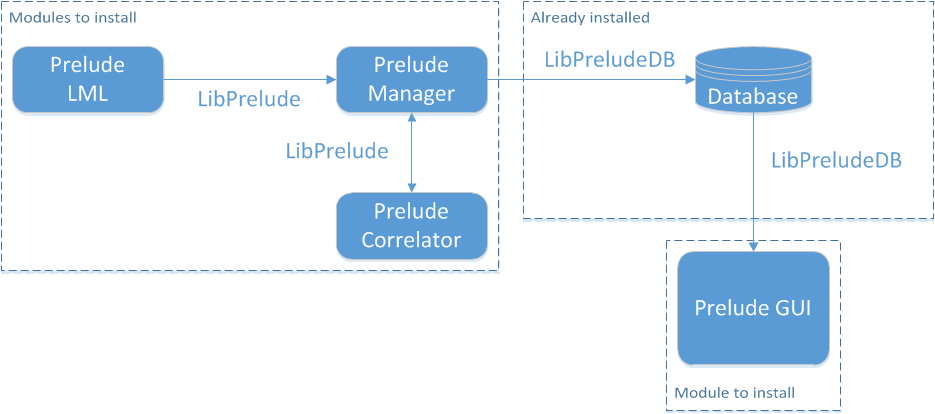
Figure : Prelude SIEM modules to install
Some modules require access to a database such as Prelude Manager and Prelude GUI.
The database must be installed before configuring and initializing the connection to a database.
Refer to the chapter Prelude SIEM database Installation to install a database if not already done.
Libprelude installation
For multi-server installation, the libprelude package must be installed on each sever where a Prelude SIEM module will be used.
The package name of the Libprelude module differs according to the operating system used:
| CentOS/RedHat |
| libprelude |
Refer to the chapter Prelude SIEM database Installation to install this package.
Prelude Manager installation
Proper installation of Prelude Manager module consists of the following procedure:
- Installing the module;
- Installing plugins as needed;
- Creating and initializing the database;
- Configuring the database access;
- Creating the Prelude Manager profile;
- Activating automatic startup (optional);
- Running the manager.
Installing the module
The package name of the manager is:
| CentOS/RedHat |
| prelude-manager |
Refer to the chapter Prelude SIEM database Installation to install this package.
On CentOS/Redhat
The Prelude Manager Pro installation on CentOS/Redhat does not require additional manipulation.
Installing plugins
A certain number of reporting plugins are available.
The following table shows the package name for each of these plugins:
| Plugins | Features | Package name on CentOS/RedHat |
|---|---|---|
| DB | Insert alerts in database | prelude-manager-db-plugin |
| XML | Export alerts in XML format (file or stderr) | prelude-manager-xml-plugin |
| SMTP | Send alerts in textual format by e-mail | prelude-manager-smtp-plugin |
| SNMP | Send alerts through SNMP traps | prelude-manager-snmp-plugin |
| Script | Execute a customizable script based on the alerts fields | prelude-manager-script-plugin |
| Relaying | Transfers alerts to another manager | package included in the installation of the Prelude Manager package |
Refer to the chapter Prelude SIEM database Installation to install this package.
Creating and initializing the database
With PostgreSQL
Only for the first CentOS/Redhat connection, initialize the PostgreSQL database:
postgresql-setup initdb
Launch the PostgreSQL database in daemon mode:
service postgresql start
Authenticate with the ‘postgres’ user:
su - postgres
Access the PostgreSQL database:
-bash-4.1$ psql -U postgres
Create a database, a user and grant them all the privileges:
postgres=# CREATE USER <user_name> WITH PASSWORD '<user_password>';
postgres=# CREATE DATABASE <database_name> ;
postgres=# GRANT ALL PRIVILEGES ON DATABASE <database_name> to <user_name>;
Quit the PostgreSQL environment:
postgres=# \q
exit
Open the configuration file named pg_hba.conf. This file is located in a different place according to the system used:
| CentOS/RedHat |
| /var/lib/pgsql/data/pg_hba.conf |
Edit the line:
host all all ident
Replace it by the following line:
host all all md5
Save the pg_hba.conf configuration file.
Restart the PostgreSQL service:
service postgresql restart
Note
When the configuration file is modified, always restart the service.
Authenticate with the ‘postgres’ user:
su - postgres
Initialize the Prelude SIEM database:
-bash-4.1$ psql -U <user_name> -d <database_name> -h <IP@host> -W -f \
/usr/share/libpreludedb/pro-ng/pgsql.sql
Example:
-bash-4.1$ psql -U prelude -d prelude_database -h 127.0.0.1 -W -f \
/usr/share/libpreludedb/pro-ng/pgsql.sql
Quit the PostgreSQL environment:
-bash-4.1$ exit
Configuring the database access.
Configure access to the database where the manager will store alerts.
With PostgreSQL
Open the /etc/prelude-manager/prelude-manager.conf configuration file and modify the [db] section as follow :
[db]
# The type of database: pgsql
type = pgsql
# Host the database is listening on.
host = localhost
# Port the database is listening on.
port = 5432
# Name of the database.
name = prelude
# Username to be used to connect the database.
user = prelude
# Password used to connect the database.
pass = prelude
Fill the fields with your information.
Refer to the section Configuring access to databases for more explanations on database configuration.
Save the configuration file.
Creating the Prelude Manager profile
To create the Prelude Manager profile, refer to the section Creating profile.
Setting the run level
Refer to the section Automatic startup of services.
Prelude LML installation
Proper installation of Prelude LML module consists of the following procedure:
- Installing the module;
- Installing LML rules;
- Setting the Prelude LML configuration;
- Registering the agent;
- Activating automatic startup (optional);
- Running Prelude LML.
Installing the module
The package name of Prelude LML is:
| CentOS/RedHat |
| prelude-lml |
Refer to the chapter Prelude SIEM database Installation to install this package.
Installing the LML rules
The package name of LML rules is:
| CentOS/RedHat |
| prelude-lml-rules |
Refer to the chapter Prelude SIEM database Installation to install this package.
Setting the Prelude LML parameters
Here is a basic configuration to parse logs and send them to the manager.
Open the /etc/prelude-lml/prelude-lml.conf configuration file:
Modify, as follows, the [format=syslog] section:
[format=syslog]
time-format = "%b %d %H:%M:%S"
prefix-regex = "^(?P<timestamp>.{15}) (?P<hostname>\S+) \
(?:(?P<process>\S+?)(?:\[(?P<pid>[0-9]+)\])?: )?"

file = /var/log/messages
file = /var/log/secure
file = /var/log/auth.log
file = /var/log/syslog
# udp-server = 0.0.0.0
It is possible to configure a UDP server. Refer to the configuration manual for more explanations.
Registering the agent
Refer to the section Registering agents for the agent registration.
Activating the automatic startup
Refer to the section Automatic startup of services.
Prelude Correlator installation
Proper installation of Prelude Correlator module consists of the following procedure:
- Installing the module;
- Registering the agent;
- Activating automatic startup (optional);
- Running Prelude Correlator.
Installing the module
Installing the Prelude Correlator package
The package name of Prelude Correlator is:
| CentOS/RedHat |
| prelude-correlator |
Refer to the chapter Prelude SIEM database Installation to install this package.
Registering the agent
Refer to the section Registering agents for the agent registration.
Activating the automatic startup
Refer to the section Automatic startup of services.
Running Prelude Correlator
Launch the Prelude Correlator service:
systemctl start prelude-correlator
Prelude GUI installation
Proper installation of the Prelude GUI module consists of the following procedure:
- Installing the module;
- Creating and initializing the database;
- Configuring the database access;
- Running Prelude GUI.
Installing the module
Installing the package
The package name is:
| CentOS/RedHat |
| prewikka |
Refer to the chapter Prelude SIEM database Installation to install this package.
Creating and initializing the database
Prelude GUI accesses two databases:
- A database where Prelude GUI reads the stored alerts by Prelude Manager Pro. In this case, Prelude GUI and Prelude Manager interact with the same database. This database already exists and therefore does not need to be created.
- A user database, internal to Prelude GUI. This is the database that will be created.
With PostgreSQL
Launch the PostgreSQL database in daemon mode:
systemctl start postgresql
Authenticate with the ‘postgres’ user:
su - postgres
Access the PostgreSQL database:
-bash-4.1$ psql -U postgres
Create the Prelude GUI database and a user with all privileges:
postgres=# CREATE USER <user_name> WITH PASSWORD '<user_password>';
postgres=# CREATE DATABASE <database_name> ;
postgres=# GRANT ALL PRIVILEGES ON DATABASE <database_name> to <user_name>;
Quit the PostgreSQL environment:
postgres=# \q
exit
Open the configuration file named pg_hba.conf. This file is located in a different place according to the system used:
| CentOS/RedHat |
| /var/lib/pgsql/data/pg_hba.conf |
Edit the line:
host all all ident
Replace it by the following line:
host all all md5
Save the pg_hba.conf configuration file.
Restart the PostgreSQL service:
service postgresql restart
Note
When the configuration file is modified, always restart the service.
Configuring the database access.
There are two databases to configure:
- The alerts database, configured in the [idmef_database] section. The configuration of alerts database is the same as the configuration made for Prelude Manager.
- The Prelude GUI database, configured in the [database] section.
With PostgreSQL
Modify, as follows, both sections in the Prelude GUI configuration file in the path /etc/prewikka/prewikka.conf:
[idmef_database]
# type: mysql | pgsql | sqlte3
type: <Same database used by the Manager>
host: <Same database used by the Manager>
user: <Same database used by the Manager>
pass: <Same database used by the Manager>
name: <Same database used by the Manager>

#This is the Prelude GUI user database you created above
[database]
# type: mysql | pgsql | sqlte3
type: pgsql
host: localhost
user: <username>
pass: <database_password>
name: <database_name>
Fill the fields with your information.
Refer to the section Configuring access to databases for more explanations on database configuration.
Save the Prelude GUI configuration file.
Running Prelude GUI
To launch Prelude GUI, refer to the section Web server installation.
Web server installation
You can run Prelude GUI from the Apache web server or run it from the embedded web server.
The following sections explain the installation of Apache and how to run the Prelude GUI according to whether you use the Apache web server or the embedded web server.
Once the Prelude GUI will be displayed, remember to execute steps of paragraphs 3 and 4 of this chapter.
Launch Prelude GUI with the Apache server
Proper installation of Prelude GUI with the Apache server consists of the following procedure:
- Installing the Apache web server package;
- Configuring Apache;
- Running Apache;
- Displaying the Prelude GUI.
Apache web server installation
Install the Apache web server and the WSGI plugin by using the packages:
| CentOS/RedHat |
| httpd mod_wsgi |
Refer to the chapter Prelude SIEM database Installation to install this packages.
Configuring Apache
Open the configuration file whose location differs depending on the operating system used:
- On CentOS/Redhat:
/etc/httpd/conf.d/prelude.conf
Enter the following script whatever the operating system used:
<VirtualHost *:80>

   ServerName <Your server name>
   # This is optional : handling is faster if this is done by Apache, but
   # Prewikka WSGI module will handle it if not.
   #
   #<Location /prelude>
   # SetHandler None
   #</Location>
   #
   # For inclusion of a non-default configuration file
   # SetEnv PREWIKKA_CONFIG /etc/prewikka/prewikka.conf
   WSGIDaemonProcess prewikka user=@HTTPD_USER@ group=@HTTPD_GROUP@ processes=4 threads=1
   WSGIProcessGroup prewikka
   WSGIApplicationGroup %{GLOBAL}
   WSGIScriptAlias / /usr/share/prewikka/prewikka.wsgi
</VirtualHost>
Replace:
- <Your server name> with your server name;
- Use the following command to know the ‘ServerName’:
hostname
<HTTPD_USER> with the user of prewikka
<HTTPD_GROUP> with the group “prelude”.
Note
If you use OAuth, it is necessary to add the following WSGI directive outside of the VirtualHost:
WSGIPassAuthorization on
Note
If you use Apache version 2.4 (available by default on CentOS 7), then you need to replace the <Location> section as follows:
<Location "/">
   Require all granted
</Location>
Save and close the configuration file.
Configuring the local firewall
To accept HTTP connections we need to add a firewall rule and save it.
On CentOS/Redhat
Enter the following command line:
firewall-cmd --permanent --add-service=http
Save this new rule:
service iptables save
Displaying Prelude GUI
Once everything is set up, you can use your browser to connect to the machine where Prelude GUI is installed.
Enter the following URL to access Prelude GUI:
http://<IP_address>/
Example:
http://172.25.104.56/
By default, the login and password to authenticate are “admin”: don’t forget to change them.
Display Prelude GUI with the embedded HTTP server (for debugging)
Warning: To not break file permissions, you have to run the following commands with your prewikka user.
Running Prelude GUI
By default, the embedded HTTP server uses the port number 8000, but you can use another port number provided that specific ports in the range [0 - 1024] are not used.
On CentOS/Redhat:
su -s /bin/sh prewikka

prewikka-httpd -p <port_number>
On Debian:
prewikka-httpd -p <port_number>
Example:
prewikka-httpd -p 8081
Displaying Prelude GUI
Once everything is set up, you can use your browser to connect to the machine where Prelude GUI is installed.
Enter the following URL to access Prelude GUI:
http://<IP_address>:<port_number>
Example:
http://172.25.104.56:8081
By default, the login and password to authenticate are “admin”: don’t forget to change them.
Modification of the default authentication parameters
By default, the login and password to authenticate to Prelude GUI are “admin”.
- Connect to Prelude GUI with the login and password “admin”;
- Create a new user by giving them all rights. Create the user in the following tab: . Click on the Create user button, and fill at least the following fields:
- Login: the login name;
- Name: The user name;
- Tick all the boxes in order to grant all rights to the user;
- Enter a password and confirm it again;
- Click on the Save button to add the user.
- Connect with the new user recently created;
- Delete the “admin” user if necessary.
Activating all APPS of Prelude
It is advised to activate all apps of Prelude GUI for a wider range of features.
The activation of apps is done in Prelude GUI by following this approach:
- Go to the following tab: ;
- Tick all apps;
- Confirm by clicking on the Update button.
All apps are now enabled.
Note
Some apps add some permissions, go to the user page to check for this.
Glossary & abbreviations
Glossary
List of terms used by Prelude SIEM. Several terms derive from the IDMEF standard.
- Agent
- A software or equipment using the Libprelude able to directly generate IDMEF alerts and heartbeats. It can be an analyzer or a manager.
- Alert
A data structure describing a security incident technically. It contains information about:
- Its classification;
- The sensor from which it originates;
- The time of detection/creation;
- Its source and its target;
- Its assessment (impact of the event).
It can be a simple alert or the grouping of related alerts into a “correlated alert”.
- Analyzer / Sensor
The emission source of an alert message.
This definition can be extended to cover not only Prelude agents (Prelude LML, Prelude Correlator, Snort, Samhain, etc.) but also services (web server, PAM, ssh, antivirus, etc.) that write in logs instead of emitting alerts.
- Path
In Prelude SIEM, the paths correspond to a simple syntax that can be used to reference the value of a field in a data structure (IDMEF alert, log entry, incident ticket, etc.). With this mechanism you can update or retrieve the value the path points to.
In particular, all classes and attributes defined in the IDMEF can be converted to paths usable by Prelude SIEM. For instance, the path
alert.classification.textcan be used to reference thetextattribute of theClassificationIDMEF class, the latter being an aggregated class of theAlertIDMEF class.- Ruleset
- A ruleset is a file containing a set of rules related to the same functional field (software, equipment, etc.).
- Libprelude
- Libprelude is a programming library that guarantees secure connections between Prelude analyzers (Prelude LML, Prelude Correlator, Snort, etc.) and the Prelude Manager. Libprelude provides an API for communication with Prelude sub-systems. It supplies the necessary functionality for generating and emitting IDMEF alerts and automates the saving and re-transmission of data in times of temporary interruption of one of the system’s components.
- LibpreludeDB
- The libpreludeDB programming library provides an abstraction layer upon the type and the format of the database used to store IDMEF alerts. It allows developers to use the Prelude SIEM database easily and efficiently without worrying about its type or storage format.
- Location
The physical site of one or several nodes.
Example: Paris
- Node
An equipment that hosts one or several analyzers/managers, identified by a network address or a name.
Example: 192.168.2.1
- Prelude Correlator
- Prelude Correlator allows conducting multi-stream correlation thanks to a powerful programming language for writing correlation rules. It has the ability to connect and fetch alerts from a remote Prelude Manager, and correlate incoming alerts based on the provided ruleset. Upon successful correlation, IDMEF correlation alerts are raised.
- Prelude GUI
- Prelude GUI is the official graphical user interface for Prelude SIEM exploitation. Providing numerous features, it facilitates the work of operators and analysts, and also provides access to external tools.
- Prelude LML
- Prelude LML is a log analyzer allowing Prelude SIEM to collect and analyze information from all kinds of sources (applications or appliances) emitting logs or syslog messages, in order to detect suspicious activities and normalize them to IDMEF format.
- Prelude Manager
Prelude Manager is the heart of Prelude SIEM and is generally called manager. It concentrates all IDMEF messages from agents, be it alerts or heartbeats.
The manager processes the received data in real time by inserting them for example into a database. It can also act as a relay, i.e. forward the messages to another manager. It is also responsible of transmitting alerts to the correlator.
- Heartbeat
A message sent in at regular intervals by agents to their attributed managers, in order to indicate their status (starting, running, stopping, etc).
The lack of some number of consecutive heartbeats indicates a failure of either the agent or its network connection.
- Syslog
- In computing, Syslog is a standard for message logging. It allows separation of the software that generates messages, the system that stores them, and the software that reports and analyzes them.
Abbreviations
| Abbreviations | Description |
|---|---|
| CTI | Cyber Threat Intelligence |
| HIDS | Host Intrusion Detection System |
| IDMEF | Intrusion Detection Message Exchange Format |
| IDS | Intrusion Detection System |
| IHM | Interface Human to Machin |
| LML | Log Monitoring Lackey |
| N/A | Not applicable |
| NIDS | Network Intrusion Detection System |
| PCRE | Perl Compatible Regular Expression |
| SIEM | Security Information & Event Management |
| SOC | Security Operations Center |
List of package names
List of package names with repository
The following table shows Prelude OSS’s package names when installing using a repository:
| Prelude components | Package name on CentOS/RedHat | Package name on Debian |
| Libprelude | libprelude | libprelude2 |
| MySQL server | mysql-server / mariadb-server | mysql-server / mariadb-server |
| PostgreSQL server | postgresql-server | postgresql |
LibpreludeDB > MySQL plugin > PostgreSQL plugin |
libpreludedb | libpreludedb0 |
| libpreludedb-mysql | libpreludedb0-mysql | |
| libpreludedb-pgsql | libpreludedb0-pgsql | |
Prelude Manager > Database plugin > XML plugin > E-mail plugin > SNMP plugin > Script plugin > Relaying plugin |
prelude-manager | prelude-manager |
| prelude-manager-db-plugin | included in the prelude-manager package | |
| prelude-manager-xml-plugin | included in the prelude-manager package | |
| prelude-manager-smtp-plugin | included in the prelude-manager package | |
| prelude-manager-snmp-plugin | included in the prelude-manager package | |
| prelude-manager-script-plugin | included in the prelude-manager package | |
| included in the prelude-manager package | included in the prelude-manager package | |
| Prelude LML | prelude-lml | prelude-lml |
| Prelude Correlator | prelude-correlator | prelude-correlator |
| Prelude GUI OSS | prewikka | prewikka |
List of package names on CentOS/Redhat without a repository
The following table shows Prelude OSS’s package names on CentOS/Redhat when installing without a repository:
| Prelude components | Package names on CentOS/RedHat 64 bits |
| Libprelude | libprelude-5.2.0-1.el7.x86_64.rpm |
| MySQL server | Get the package on the official repository of your Linux distribution |
| PostgreSQL server | Get the package on the official repository of your Linux distribution |
LibpreludeDB > MySQL plugin > PostgreSQL plugin |
libpreludedb-5.2.0-1.el7.x86_64.rpm |
| libpreludedb-mysql-5.2.0-1.el7.x86_64.rpm | |
| libpreludedb-pgsql-5.2.0-1.el7.x86_64.rpm | |
Prelude Manager > Database plugin > XML plugin > E-mail plugin > SNMP plugin > Relaying plugin |
prelude-manager-pro-5.2.0-1.el7.x86_64.rpm |
| prelude-manager-pro-db-plugin-5.2.0-1.el7.x86_64.rpm | |
| prelude-manager-pro-xml-plugin-5.2.0-1.el7.x86_64.rpm | |
| prelude-manager-pro-smtp-plugin-5.2.0-1.el7.x86_64.rpm | |
| prelude-manager-pro-smtp-plugin-5.2.0-1.el7.x86_64.rpm | |
| included in the Prelude Manager package | |
| Prelude LML | prelude-lml-5.2.0-1.el7.x86_64.rpm |
| Prelude LML rules | prelude-lml-rules-5.2.0-1.el7.noarch.rpm |
| Prelude Correlator | prelude-correlator-5.2.0-1.el7.noarch.rpm |
| Prelude GUI OSS | prewikka-5.2.0-1.el7.noarch.rpm |
List of package names on Debian without a repository
The following table shows Prelude OSS’s package names on Debian when installing without a repository:
| Prelude components | Package name on Debian 64 bits |
| Libprelude | libprelude2_5.2.0-1_amd64.deb |
| MySQL server | Get the package on the official repository of your Linux distribution |
| PostgreSQL server | Get the package on the official repository of your Linux distribution |
LibpreludeDB > MySQL plugin > PostgreSQL plugin |
libpreludedb0_5.2.0-1_amd64.deb |
| libpreludedb0-mysql_5.2.0-1_amd64.deb | |
| libpreludedb0-pgsql_5.2.0-1_amd64.deb | |
| Prelude Manager | prelude-manager-pro_5.2.0-1_amd64.deb |
| Prelude LML | prelude-lml_5.2.0-1_amd64.deb |
| Prelude Correlator | prelude-correlator_5.2.0-1_all.deb |
| Prelude GUI OSS | prewikka_5.2.0-1_all.deb |
Backup
Backup of the Prelude SIEM configuration files
The files in the following folders should be saved:
/etc/prelude-manager//etc/prelude-lml//etc/prelude-correlator//etc/prewikka//var/lib/prewikka/
Backup of the Prelude SIEM databases
The following databases should be saved:
- prewikka: user database
The connection information to these databases is available in the following files:
/etc/prewikka/prewikka.conf
The ‘prelude’ database containing alerts can be saved, however its size can be important. The connection information to this database is available in the /etc/prelude-manager/prelude-manager.conf file.
CS GROUP - France
22, Avenue Galilée
92350 Le Plessis-Robinson - France
Tel: +33 (0)1 41 28 40 00
Fax: +33 (0)1 41 28 40 40
www.csgroup.eu