How to create a plugin - Part 2 Inventory
- How to create a plugin - Part 2 Inventory
This tutorial is based on Prewikka 3.1.0 and Python 2.X (where X >= 6).
It will teach you how to create a plugin that adds a basic inventory view to the Prewikka interface. This can be useful to keep information about the computers and network equipment we want to supervise.
For a simpler example of a Prewikka plugin, you can visit this page.
Introduction
In this tutorial we will learn how to:- use a template file for displaying our page, including CSS and Javascript;
- define and use database tables for storing our inventory;
- create and handle a new configuration file;
- use the hook mechanism for more interactivity between different views.
File hierarchy
|-- inventory
|   |-- htdocs
|   |   |-- css
|   |   |   `-- inventory.css
|   |   `-- js
|   |       `-- inventory.js
|   |-- __init__.py
|   |-- sql
|   |   `-- install.py
|   `-- templates
|       |-- __init__.py
|       |-- inventory.py
|       `-- inventory.tmpl
`-- setup.py
Creating a new plugin
Like previously, let's begin by creating a directory named inventory and editing our main file inside it named __init__.py:
"""A basic inventory plugin"""
from prewikka import view

class Inventory(view.View):
    """The main Inventory view"""
    plugin_name = "Inventory"
    plugin_description = "A basic inventory plugin"
    plugin_version = "1.0.0"
    view_name = "Inventory"
    view_section = "Inventory"
And the setup.py script associated to it:
from setuptools import setup

setup(name="prewikka-inventory",
      version="1.0.0",
      author="Jane Doe",
      author_email="jane.doe@acme.com",
      url="https://prelude-siem.org",
      packages=["inventory"],
      install_requires=["prewikka >= 3.1.0"],
      entry_points={
          "prewikka.views": [
              "Inventory = inventory:Inventory",
          ],
          "prewikka.updatedb": [
              "inventory = inventory.sql",
          ],
      },
      package_data={
          "inventory": ["htdocs/css/*.css", "htdocs/js/*.js",
                        "sql/*.py", "templates/*.py"]
      })
Here you can see we added a package_data parameter to the setup, that will include all additional files necessary to our plugin.
From now on, if you want to see the plugin advancement before it is finished, you can directly jump to the last paragraph.
Adding the database support
As we want to store data about our IT equipment, we will use the Prewikka database and create our own tables. To this purpose, we need to:- define the SQL schema for the tables ;
- implement the Python functions to query the tables.
Defining the schema
The first task is done in a new file, inventory/sql/install.py:
from prewikka.database import SQLScript

class SQLUpdate(SQLScript):
    type = "install"
    version = "0"

    def run(self):
        self.query("""
DROP TABLE IF EXISTS Prewikka_Inventory;

CREATE TABLE Prewikka_Inventory (
    hostname TEXT NOT NULL,
    address TEXT NULL,
    os TEXT NULL
);
""")
Basically, we define the operations needed to create the inventory schema in version "0".
In this example, a single table named Prewikka_Inventory will be enough, that will store the name, the IP address and the operating system of the host.
Defining the API
The second task is done in the same __init__.py than previously but in a new class, named InventoryDatabase.
For a start, let's define a function to retrieve hosts from the inventory, and another function to add a new host into the inventory:
class InventoryDatabase(database.DatabaseHelper):
    """Handle database queries related to the inventory"""

    def get_hosts(self, keyword=None):
        """Return all hosts in the inventory database matching the keyword"""
        query = "SELECT hostname, address, os FROM Prewikka_Inventory"
        if keyword:
            query += (" WHERE hostname = %(keyword)s"
                      " OR address = %(keyword)s"
                      " OR os = %(keyword)s")
        return self.query(query, keyword=keyword)

    def add_host(self, hostname, address, os):
        """Add a host to the inventory database"""
        self.query("INSERT INTO Prewikka_Inventory (hostname, address, os) "
                   "VALUES (%s, %s, %s)", hostname, address, os)
Initializing the Inventory class
Make sure to import the database module in order to sub-class DatabaseHelper:
from prewikka import database, view

class Inventory(view.View):
    [...]
    plugin_database_version = "0"

    def __init__(self):
        view.View.__init__(self)
        self._db = InventoryDatabase()
Adding the template file
Creating the template
Now we have to create a inventory/templates/inventory.tmpl file based on Cheetah.
This is the template file for our inventory view, where we describe a table with three columns (hostname, address and os) and as many lines as returned by the Python code through the $inventory variable:
#filter CleanOutput
<table class="inventory table table-striped table-bordered table-rounded table-condensed">
  <tr>
    <th>Hostname</th>
    <th>Address</th>
    <th>OS</th>
  </tr>
  #for $host, $address, $os in $inventory
  <tr>
    <td>$host</td>
    <td>$address</td>
    <td>$os</td>
  </tr>
  #end for
</table>
#end filter
A inventory/templates/__init__.py file should also be created with the following content:
from inventory import inventory
Defining the accepted parameters
By sub-classing view.Parameters, we are able to define which HTTP parameters are allowed for our inventory view, and which are mandatory.
The search parameter will be useful for querying the inventory, and the others (hostname, address and os) for adding a new host:
class InventoryParameters(view.Parameters):
    """A class that handles HTTP parameters for the Inventory view"""

    def register(self):
        self.optional("search", str)
        self.optional("hostname", str)
        self.optional("address", str)
        self.optional("os", str)
And the corresponding code in the Inventory class:
from . import templates

class Inventory(view.View):
    [...]
    view_template = templates.inventory
    view_parameters = InventoryParameters
    [...]

    def render(self):
        params = self.parameters
        if "hostname" in params:
            self._db.add_host(params.get("hostname"),
                              params.get("address"),
                              params.get("os"))
        self.dataset["inventory"] = self._db.get_hosts(params.get("search"))
You can see here that we initialize self.dataset["inventory"] to the host list. This variable can be used in the template as $inventory, as we previously did.
Including CSS and Javascript files
Defining the plugin_htdocs attribute
It is mandatory to define the plugin_htdocs attribute in Inventory class for the web server to search the CSS/Javascript files in the right place.
from pkg_resources import resource_filename

class Inventory(view.View):
    [...]
    plugin_htdocs = (("inventory", resource_filename(__name__, "htdocs")),)
    [...]
Creating the CSS
The inventory/htdocs/css/inventory.css file is fairly simple:
table.inventory th {
    background: lightblue;
}
Creating the Javascript
Here is the inventory/htdocs/js/inventory.js file:
$(document).on("click", "button.create", function() {
    $("div#inventory-dialog").last().dialog({
        "buttons": [{
            "class": "btn btn-default",
            "text": "OK",
            "click": function() {
                $(this).find("form").submit();
            }
        }]
    });
});
This jQuery snippet aims to open a dialog box when the user clicks on the creation button.
The button and form are yet to be added to the template for making that possible.
Updating the template
The template must be updated in order to include the CSS and Javascript files.
The second inclusion is done with LABjs.
Edit the inventory/templates/inventory.tmpl file to add these lines at the beginning:
<link rel="stylesheet" type="text/css" href="inventory/css/inventory.css">

<script type="text/javascript">
  \$LAB.script("inventory/js/inventory.js");
</script>
And these lines at the end:
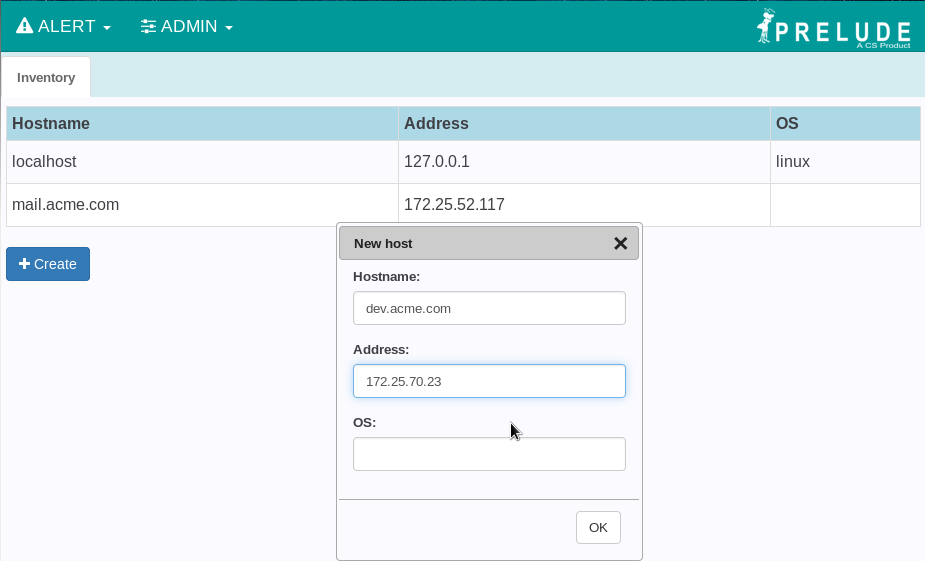
<button class="create btn btn-primary"><i class="fa fa-plus"></i> Create</button>

<div id="inventory-dialog" title="New host" style="display: none;">
  <form method="post">
    #for $label, $name in ("Hostname", "hostname"), ("Address", "address"), ("OS", "os")
    <div class="form-group">
      <label>$label:</label>
      <input type="text" class="form-control" name="$name"/>
    </div>
    #end for
  </form>
</div>
Handling a custom configuration file
The main Prewikka configuration file is typically located in /etc/prewikka/prewikka.conf.
However, all .conf files located in /etc/prewikka/conf.d/ are also imported by default, as we can see in the [include] section of the main config file:
[include]
conf.d/*.conf
We can therefore create our own /etc/prewikka/conf.d/inventory.conf which will contain the following lines:
[inventory]
title: My Inventory
The goal here is to allow the user to customize the title displayed on the inventory page.
So just add these lines to the Inventory class:
class Inventory(view.View):
    [...]

    def render(self):
        [...]
        self.dataset["title"] = env.config.inventory.get("title", "Inventory")
And replace in the template file:
<div id="inventory-dialog" title="New host" style="display: none;">
by:
<div id="inventory-dialog" title="$title" style="display: none;">
Implementing a hook
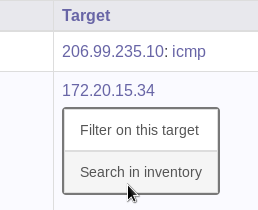
We're almost there. But because we want our plugin to be more practical, it would be a good idea to be able to search through the inventory from other Prewikka pages.
For example, how can we add a link to the inventory when clicking on a host in the AlertListing view?
This is where the hook mechanism comes into play.
Fortunately, a hook called HOOK_LINK has been created in AlertListing. This means that each plugin that registers to this hook will see its custom content inserted into the drop down menu appearing in the AlertListing view.
Let's do this by editing the Inventory class one last time:
class Inventory(view.View):
    [...]

    @hookmanager.register("HOOK_LINK")
    def _get_inventory_link(self, value):
        """Create a link to the inventory to be displayed in the alert view"""
        return ("host",
                "Search in inventory",
                utils.create_link(self.view_path, {"search": value}),
                False)
- typ is the link type (only "host" is supported at the moment);
- linkname is the text of the link that will be displayed;
- link is the link to our inventory page;
- widget is a boolean controlling whether the link will be opened in a widget or not.
And let's not forget to import the necessary modules:
from prewikka import database, env, hookmanager, utils, view
Testing the plugin
Installation
cheetah-compile inventory/templates/inventory.tmpl
python setup.py install
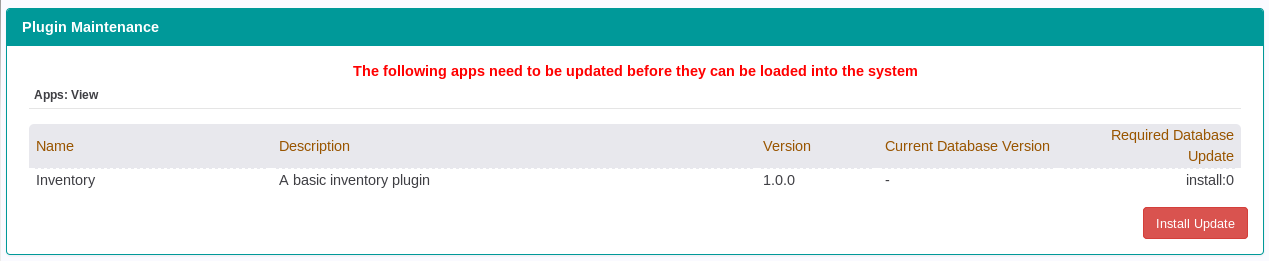
Plugins page
After a Prewikka restart, you must install your database schema by visiting the Plugins page:
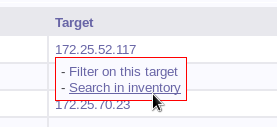
AlertListing page
The link to the inventory has appeared:
Inventory page
And here is our Inventory page: